Setting Up Anovos on Google Colab
Colab is an offer by Google Research that provides access to cloud-hosted Jupyter notebooks for collaborating on and sharing data science work.
Colab offers substantial compute resources even in its free tier and is integrated with Google Drive, making it an excellent place to explore libraries like Anovos without setting up anything on your local machine.
If you're not yet familiar with Google Colab, the following selection of introductory tutorials are an excellent starting point to familiarize yourself with this platform:
- LeanIn Women In Tech India: Google Colab — The Beginner’s Guide
- GeeksForGeeks: How to use Google Colab
- DataCamp: Google Colab Tutorial for Data Scientists
Step-by-step Instructions for Using Anovos on Google Colab
The following four steps will guide you through the entire setup of Anovos on Google Colab.
The instructions assume that you're starting out with a fresh, empty notebook environment.
Step 1: Installing Spark dependencies
Anovos builds on Apache Spark, which is not available by default in Google Colab. Hence, before we can start working Anovos, we need to install Spark and set up a Spark environment.
Since Spark is a Java application, we start out by installing the Java Development Kit:
Then, we can download Spark:
💡 In this tutorial, we use Java 8 and Spark 2.4.8. You can use more recent versions as well. See the list of currently supported versions to learn about available options.
Next, unzip the downloaded Spark archive to the current folder:
Now we'll let the Colab notebook know where Java and Spark can be found by setting the corresponding environment variables:
import os
os.environ["JAVA_HOME"] = "/usr/lib/jvm/java-8-openjdk-amd64"
os.environ["SPARK_HOME"] = "/content/spark-2.4.8-bin-hadoop2.7"
To access Spark through Python, we need the pyspark library as well as the findspark utility:
💡 Make sure that the version of pyspark matches the Spark versions you downloaded.
Step 2: Installing Anovos and its dependencies
Clone the Anovos GitHub repository to Google Colab:
💡 Using the --branch flag allows you to select the desired release of Anovos.
If you omit the flag, you will get the latest development version of Anovos, which might not
be fully functional or exhibit unexpected behavior.
After cloning, let's enter the newly created Anovos directory:
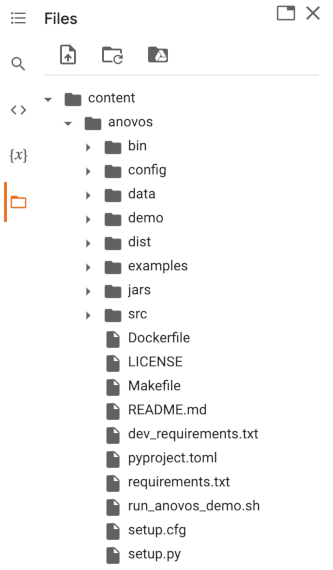
As indicated by the output shown, Anovos was placed in the folder /content/anovos,
which you can also access through the sidebar:
The next step is to build Anovos:
As the final step before we can start working with Anovos, we need to install the required Python dependencies:
Step 3: Configuring an Anovos workflow
Anovos workflows are configured through a YAML configuration file. To learn more, have a look at the exhaustive Configuring Workflows documentation.
But don't worry: We'll guide you through the necessary steps!
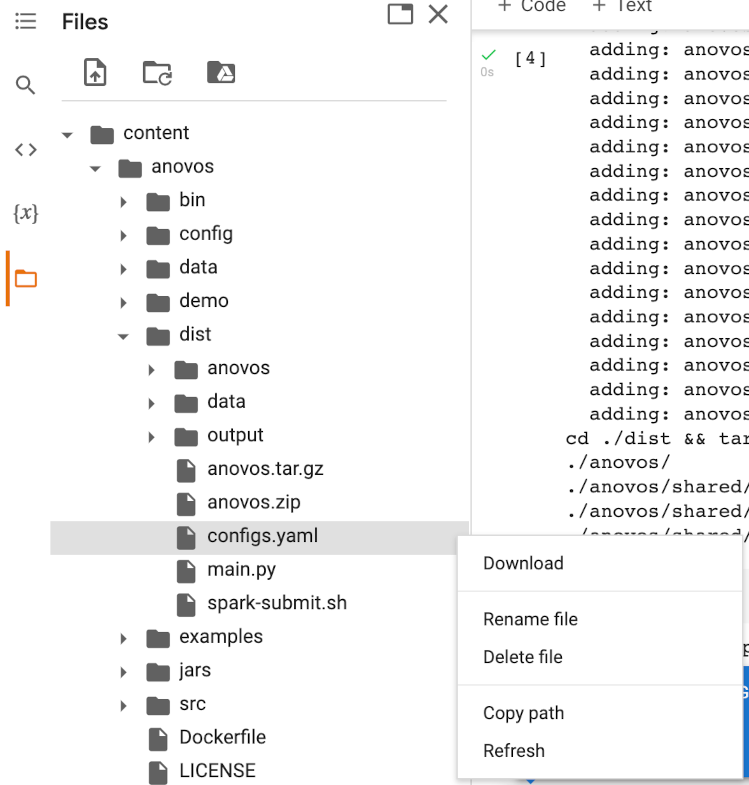
First, open the file viewer in the sidebar and download the configs.yaml file from the dist folder
by right-clicking on the file and selecting Download:
After downloading the configs.yaml file, you can now adapt the workflow it describes to your needs.
For example, you can define which columns from the input dataset are used in the workflow.
To try it yourself, find the delete_column configuration in the input_dataset block and add
the column workclass to the list of columns to be deleted:
You can learn more about this and all other configuration options in the Configuring Workflows documentation. Each configuration block is associated with one of the various Anovos modules and functions.
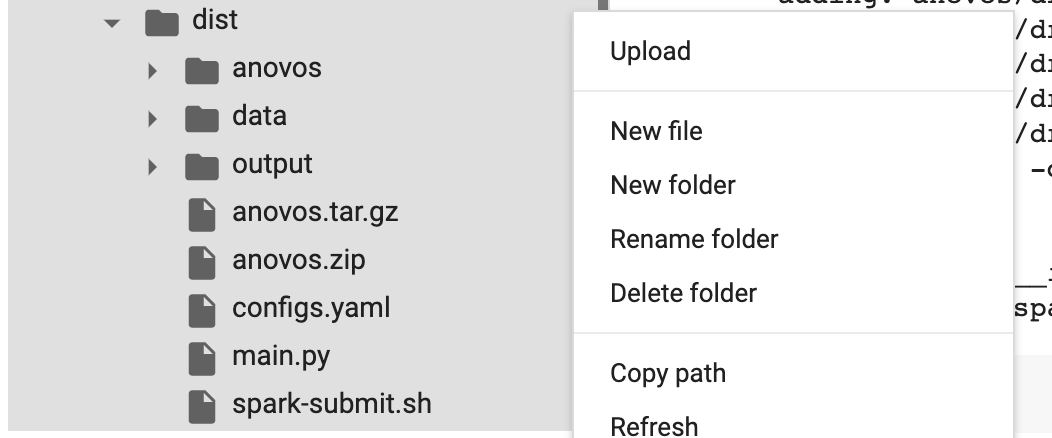
Once you adapted the configs.yaml file, you can upload it again by right-clicking on the dist folder
and selecting Upload:
Step 4: Trigger a workflow run
Once the workflow configuration has been uploaded, you can run your workflow.
Anovos workflows are triggered by executing the spark-submit.sh file that you'll find in the dist folder.
This script contains the configuration for the Spark executor.
To change the number of executors, the executor's memory, driver memory, and other parameters, you can edit this file.
For example, in case of a very large dataset of several GB in size,
you might want to allocate more memory to the Anovos workflow.
Let's go ahead and change the executor memory from the pre-defined 20g to 32g:
To make this or any other change, you need to download and upload the spark-submit.sh file similarly
to the configs.yaml file as described in the previous section.
Once the adapted spark-submit.sh has been uploaded, we can trigger the Anovos workflow run by
entering the dist directory and running spark-submit.sh:
The nohup command together with the & at the end of line ensures that the workflow is executed
in the background, allowing us to continue working in the Colab notebook.
To see what your workflow is doing, have a look at run.txt, where all logs are collected:
Once the run completes, the reports generated by Anovos and all intermediate outputs are stored at the specified path.
The intermediate data and the report data are saved at the master_path and the final_report_path
as specified by the user inside the configs.yaml file.
By default, these are set to report_stats and you should find all output files in this folder:
To view the HTML report, you'll have to download the basic_report.html file to your local machine,
using the same steps you took to download the configs.yaml and spark-submit.sh files.
What's next?
In this tutorial, you've learned the basics of running Anovos workflows on Google Colab.
- To learn all about the different modules and functions of Anovos, have a look at the API documentation.
- The Configuring Workflows documentation contains a complete list of all possible configuration options.